
GED is editor of photo and bitmap pictures with basic set function. It is designed to be augmented with plug-ins. It support macro.
Program is forms of two windows. One of them is Aplication window, it consists pallet of icon buttons with functions and also contains simple menu for create new picture or open picture. The second window is Document window (image window), it contains drawing space, menu and status bar. The GED is MDI aplication - many images can be open at the same time.
Editor communicates English - language.
The Aplication window is main part of GED. It contains the basic menu, plus a set of icon buttons that can be used to select tool, and more.
Tool icons: These icons are buttons that activate tools for a variety of purposes: selecting parts of images, painting on them, etc.
Foreground/Background colors: The color buttons here shows current foreground and background colors. Clicking on either one of them brings up a color selector dialog that allow you to change to a different color.
Settings size of brush: Below color areas are scroll bars, whereby you can set size brush and rubber.
back - Aplication window
|
Content
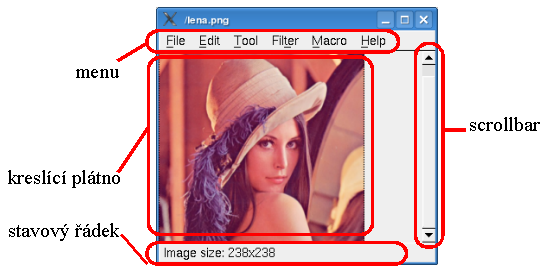
Each image open in GED is displayed in a new window. Many images can be open at the same time: the limit is set only by the amount of system resources. Document window contain drawing place, status bar and menu.
Status bar shows size of image in pixels, select tool and also shows effective mouse position.
Menu is describe in next part of help: Controls.
back - Document window
|
Content
start GED
You can start GED by typing ged2006 on a commnad line. Also you can start GED with opened images which enter like argument.
Example:
ged2006 image1.png image2.png
In this case GED starts with two opened Document window.
This is describtion the Document (image) menu. Menu of Aplication window contains basic items such as create new image, open image, shows help, and close the aplication.
Document menu consist of:
The GED provides a fit toolbox in order to quickly perform basic tasks such as making selections or drawing circle.
For all these tools is two possibilities how to be called:
Graphic tools |
|
| Brush | draw free hand lines |
| Rubber | erase areas of color from image |
| Line | draw straight line |
| Box | draw box of any size |
| Circle | draw circle of any size |
| Ellipse | draw ellipse of any size |
| Text | places text into an image |
| Select | rectangle select |
The Brush tool is used to draw free hand lines with a hard edge. In the Aplication window you can set size and color of brush. Size of brush it can be set in range from 1 to 10.
The Eraser is used to remove areas of color from a selection or from image. If the Eraser is used on something that does not support transparency, then erasing will show the background color, as displayed in the Background Brush of the Aplication window. Otherwise, erasing will produce full transparency. In the Aplication window you can set size and background color of rubber. Size of rubber it can be set in range from 1 to 10.
The Line tool is used to draw straight line. In the Aplication window you can set size and color of line.
The Box tool is used to draw box of any size. In the Aplication window you can set size and color of line of the box.
The Circle tool is used to draw circle of any size. In the Aplication window you can set size and color of curve of the circle.
The Ellipse tool is used to draw ellipse of any size. In the Aplication window you can set size and color of curve of the ellipse.
The Text tool places text into an image. When you click on an image with this tool the text editor dialog is opened where you can type your text. Color of a text you can set in the Aplication window on the button Foreground Brush. Setting of Background Brush sets color of relief of a text. Size of a text is able to regulate by scroll bar below button Foreground Brush. Range is from 1 to 10. Value times size of text.
Rectangle selection. If you do something to an image, you only want a part of it to be affected. The selection mechanism makes this possible.
back - Graphic tools
|
Content
In GED, a filter is a plug-in that modifies the look of an image. Apply chosen filter gets on the image or the select part of image. GED includes two basic graphic filter:
Anoter filters shipped with GED as a plug-ins:
You can find this filter in the Document menu: Filter -> some filter. If folder for addition filters is empty this menu item is hidden.
For filters you install yourself, copy the compiled file of filter to the GED's plug-ins directory. Directory for plug-in adjusts in configuration file ged.conf.After start GED is the filter displayed in the menu, as new item.
GED plug-ins are external programs that run under the control of the GED.
A few plug-ins are included in the GED, and installed automatically along with GED.
installation new plug-ins
The plug-ins that are included with GED don't require any special installation. Do you want install the new plug-in, how do it? Copy the compiled file of some plug-in to the GED's plug-ins directory. Directory for plug-in adjusts in configuration file ged.conf. GED automatically appends new plug-in into the program and from next start of GED is ready to be used. If is plug-in some graphic filter, is displayed in the Document menu as new item. Plug-in also may add support for others image file formats etc.
using plug-ins
For the most part you can use a plug-in like any other GED tool. They can be accessed through menu: Filter.
Macro is simple program which after startup perform required graphic action with the image.
create macro
Go to the Document menu: Macro -> Load. After you click on this item, recording marco starts. Now you can do some graphic operation (apply filters, call another macro, etc). When will you ready with your adjustment, go to the Document menu: Macro -> Create macro. You will ask to enter name of the new macro. Now macro is finished. It will show as new item in the menu: Macro. If you enter name which already there has been, old macro will rewritten new macro.
using macro
Go to the Document menu: Macro and choose macro by click at it. Macro starts and performs function in the image or in the select part of image.
| Kamil Dudka | xdudka00 |
| Jakub Filak | xfilak01 |
| Lukas Hefka | xhefka00 |
| Ludek Hradil | xhradi08 |